The difference between a thriving indoor fern and one that slowly declines often comes down to a single habit: regular observation. Most fern problems are easy to fix when caught early — and equally easy to miss until they've become serious. A quick weekly check takes less than five minutes and can prevent weeks of recovery work.
This guide gives you a practical, room-by-room inspection routine that you can follow every week without needing any special tools or expertise. Think of it as a health check — the kind your doctor would do, but for your plants.
Why Weekly Checks Matter for Ferns
Ferns communicate their needs through visual signals — changes in color, texture, posture, and soil condition. The problem is that these signals often appear gradually, and by the time they're obvious, the plant has been struggling for weeks. A regular weekly inspection catches those early signals before they escalate.
- Pest infestations: Spider mites and fungus gnats establish themselves quickly. A week of unchecked growth can turn a small infestation into a major problem.
- Root rot: Often invisible above soil until advanced. Checking soil moisture and smell weekly catches early signs.
- Humidity drops: Seasonal heating and cooling changes air conditions. Weekly checks let you respond before fronds start browning.
- New growth signals: Noticing fiddleheads early lets you adjust care to support healthy new frond development.
The Weekly Inspection Checklist

Work through this checklist from the top of the plant downward, finishing with the soil and roots. It takes about 3-5 minutes per plant once you develop the habit.
Frond Color and Appearance
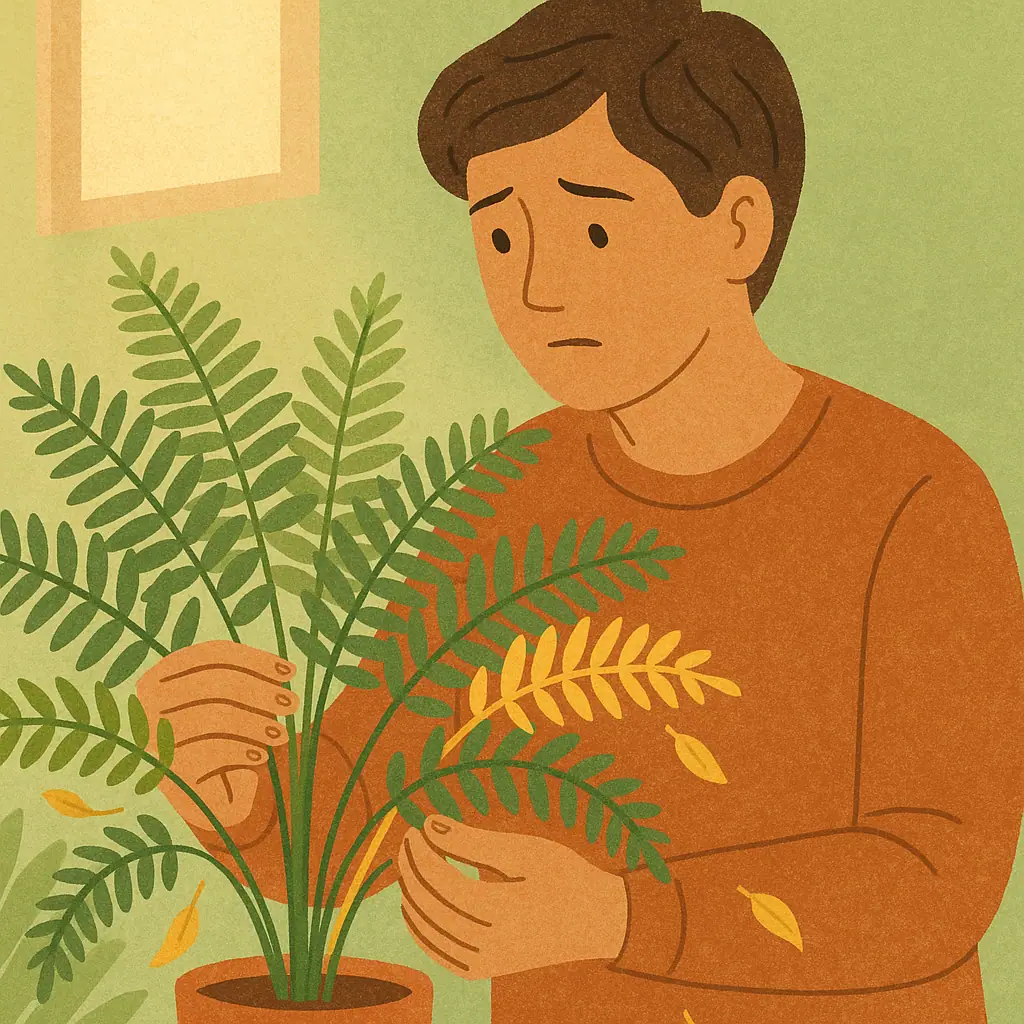
Start by stepping back and looking at the plant as a whole. The overall color tells you a great deal at a glance. Healthy ferns are a rich, deep green. Faded or pale fronds often indicate light problems. Yellow fronds across the plant suggest watering imbalance. Brown fronds — where and how they're browning — narrow down the diagnosis considerably.
Look specifically for:
- Yellowing starting at the base: Normal aging of older fronds. Remove them at the base.
- Yellowing throughout younger fronds: Possible overwatering or root rot.
- Brown, crispy tips on multiple fronds: Low humidity or fluoride sensitivity in tap water.
- Dark brown spots with yellow halos: Possible bacterial infection from overwatering.
- Pale, washed-out color across the whole plant: Too much direct light or nutrient deficiency.
Frond Texture and Posture
Touch a few fronds gently. Healthy fern fronds should feel firm and slightly waxy — not limp, not dry and brittle. Drooping fronds that feel soft and the soil is wet = overwatering. Drooping fronds that feel brittle and the soil is bone dry = underwatering. The same symptom with two very different causes — which is why you check soil too.
Pest Inspection
Turn a few fronds over and look at the undersides — this is where most pests live and feed. Spider mites appear as tiny moving dots (often needing a magnifying glass) with fine webbing between fronds. Mealybugs show as cottony white deposits in leaf joints. Scale insects look like small bumps that don't move and may be slightly shiny. Fungus gnats show up as tiny flies near the soil surface when you water.
Check 3-4 different fronds from different parts of the plant. New infestations often start on one section and spread outward.
Soil and Watering Assessment
Insert your index finger about an inch (2.5 cm) into the soil. For most ferns, you want to feel slightly cool and barely damp — not wet, not dry. This is the sweet spot. If it feels clearly wet more than 3 days after your last watering, your drainage may be insufficient. If it feels completely dry within 2 days, your pot may be too small or the environment too dry.
Check the soil surface as well. White crusty deposits on the soil surface indicate salt buildup from hard water or over-fertilizing — flush the soil with plain water. Gray-green fuzzy growth (mold) on the soil surface signals overwatering and poor air circulation.
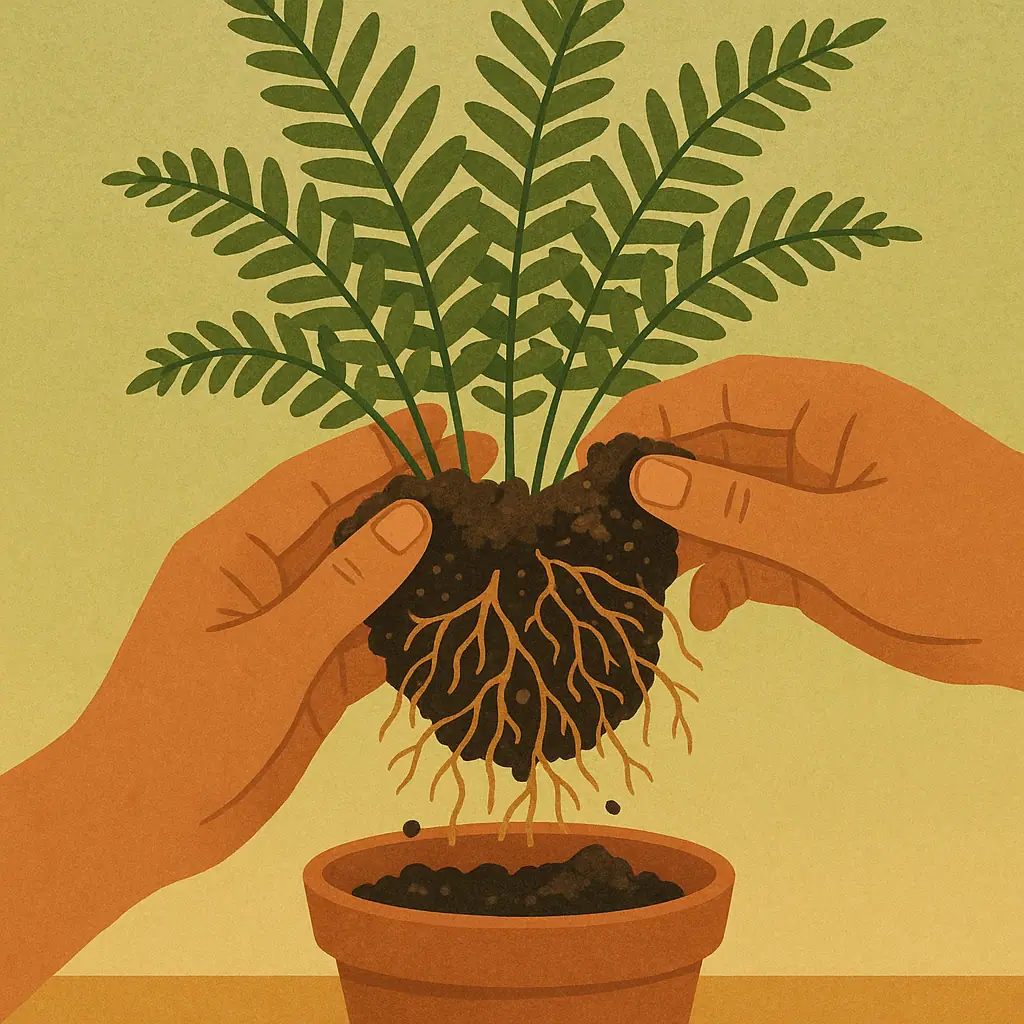
Drainage and Pot Check
Look at the drainage holes from underneath. Roots growing out through drainage holes is your first clear sign of a root-bound plant that will need repotting soon. Water should flow freely through the bottom when you water — if it pools on the surface or drains very slowly, your soil may be compacted and need refreshing.
Pros and Cons of Weekly Inspection Routines
Early pest detection
Catching mites or mealybugs in their first week is dramatically easier than treating an established infestation weeks later.
Pattern recognition over time
Weekly checks help you learn your specific fern's normal behavior, making anything unusual easy to spot immediately.
Prevents reactive crisis management
Most fern emergencies — root rot, severe underwatering, advanced pest damage — are preventable with consistent early observation.
Over-correcting based on single observations
One slightly yellow frond doesn't mean a crisis — context matters. Look for patterns over multiple weeks before making major care changes.
Skipping checks in "good" periods
Problems often begin during apparently stable periods — seasonal transitions and new purchases are particularly high-risk times to skip inspection.
Environment Check: Light, Temperature, and Humidity
Take thirty seconds to assess the environment around your fern. Has anything changed since last week? Did you close a window that was providing humidity? Has direct sunlight started reaching the plant as the season shifts? Did someone move the plant closer to a heating vent?
Ferns are sensitive to gradual changes that build up over weeks. The weekly check is your opportunity to catch drift before it becomes a problem. If you have a hygrometer, glance at the reading — ferns prefer 50-70% humidity. Below 40% is concerning, especially in winter.
Frequently Asked Questions
How can I tell if my fern is actually healthy or just surviving?
A truly thriving fern produces new fiddleheads (curled young fronds) regularly during the growing season, maintains rich green color throughout, and holds its fronds upright with good structure. A merely surviving fern may look stable but produces little or no new growth and gradually loses fronds without replacing them.
What should I do if I find pests during the weekly check?
Act immediately — isolate the plant from others first. For most common fern pests, start with a thorough shower under room-temperature water to physically remove pests, then apply diluted neem oil or insecticidal soap to all leaf surfaces, especially undersides. Repeat every 5-7 days for 3-4 weeks to break the pest life cycle.
Is it better to check ferns daily or weekly?
Weekly checks are sufficient for most ferns and are more sustainable as a long-term habit. Daily checks can cause anxiety and may lead to over-correcting minor variations. The exception is new plants, recently repotted ferns, or plants recovering from illness — these benefit from brief daily observations for the first few weeks.
Should I keep records of my weekly inspections?
A simple notebook or phone note with the date and any observations is surprisingly helpful. Even brief entries like "Tuesday: 2 yellow fronds removed, soil slightly dry, humidity 45%" create a pattern over time that makes diagnosis much easier when problems appear.
Final Thoughts
The weekly inspection habit is perhaps the single most valuable thing you can do for your indoor ferns. It costs almost nothing in time, requires no special equipment, and gives you the information you need to make smart, timely decisions about your plant's care.
Give it three weeks. You'll be surprised how quickly you start recognizing your specific fern's patterns — what's normal for it, what's changing, and what needs attention. That knowledge is what separates confident, successful plant parents from those who feel like they're always guessing.