Finding tiny bugs crawling around your beautiful fern can be alarming, but here’s some immediate reassurance: most fern pests are more annoying than dangerous and can be treated successfully with the right approach.
The key is identifying exactly what you’re dealing with, because different pests need different treatments. What works for spider mites won’t necessarily work for fungus gnats, and using the wrong treatment can sometimes make the problem worse.
Think of pest control like detective work – once you know who the culprit is, you can choose the most effective solution. This guide will help you become a pest detective and give you proven strategies that actually work for indoor ferns.
The Most Common Fern Pests
Indoor ferns typically deal with just a handful of pest problems. Learning to recognize these common troublemakers will help you act quickly and effectively.
Understanding Why Ferns Attract Pests
Ferns are particularly attractive to certain pests because of their ideal growing conditions:
- High humidity: Creates perfect breeding conditions for many insects
- Dense foliage: Provides hiding spots and protection from predators
- Consistent moisture: Attracts pests that thrive in damp environments
- Soft tissues: Easy for piercing insects to feed on
- Indoor environment: No natural predators to keep pest populations in check
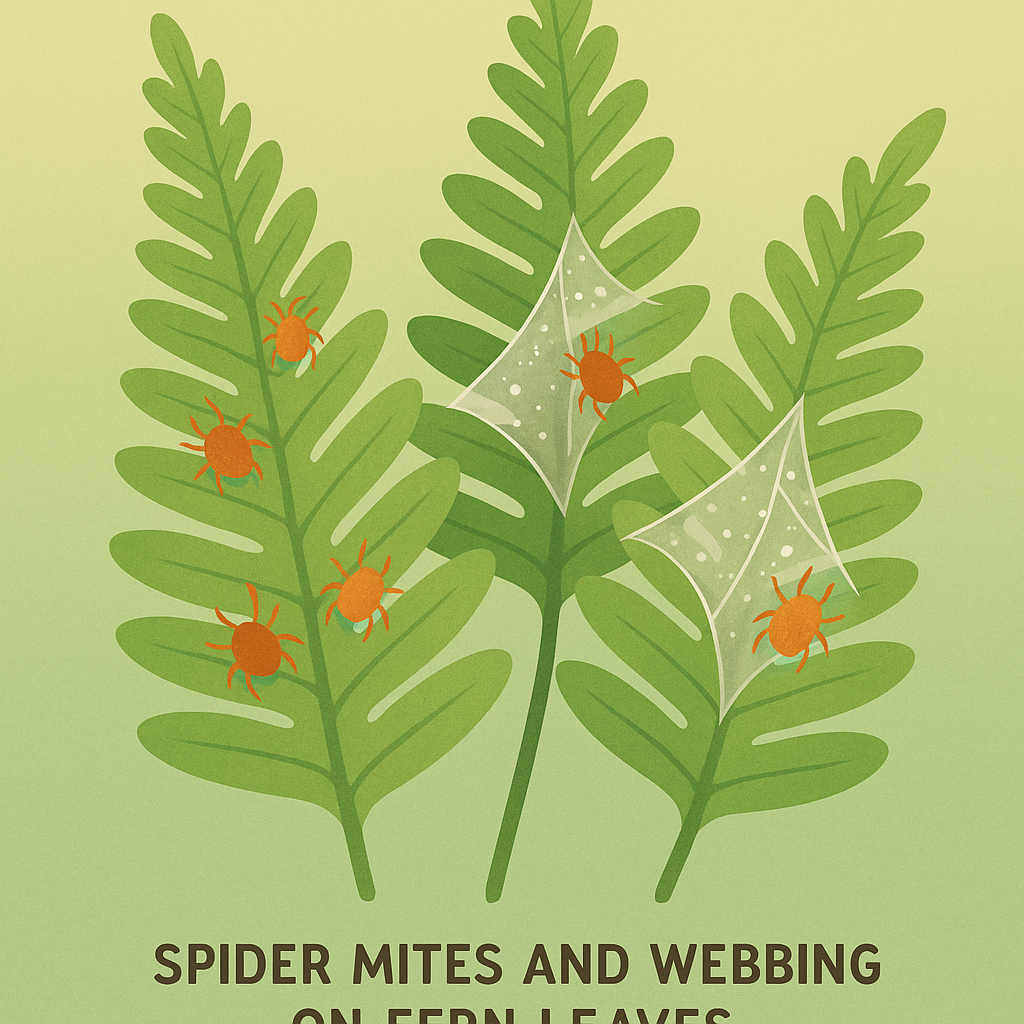
Spider Mites: The Tiny Web Spinners
Spider mites are probably the most common pest on indoor ferns. These microscopic creatures are barely visible to the naked eye but leave telltale signs of their presence.
Identifying Spider Mites
Spider mites can be tricky to spot initially, but they leave clear evidence:
- Stippled leaves: Tiny white or yellow dots where they’ve fed
- Fine webbing: Delicate webs, especially where fronds join the stem
- Dust-like movement: Hold a white paper under affected fronds and tap – you’ll see tiny moving specks
- Bronze coloring: Severely infested leaves may turn bronze or yellow
Spider Mite Treatment
Spider mites hate humidity and water, which makes treatment straightforward:
- Shower treatment: Rinse the entire plant thoroughly with lukewarm water weekly
- Increase humidity: Use a pebble tray or humidifier to raise humidity above 50%
- Neem oil spray: Apply diluted neem oil every 3-4 days until population is controlled
- Isolation: Keep affected plants separate until treatment is complete
Fungus Gnats: The Soil Fliers
These small, dark flies that hover around your fern are often mistaken for fruit flies. While the adult gnats are just annoying, their larvae in the soil can damage roots.
Identifying Fungus Gnats
Fungus gnats are usually easy to spot:
🏆 Adult Gnats – Obvious Sign
Small dark flies that circle the plant, especially when you water or move the pot.
⭐ Larvae in Soil – Root Danger
Tiny white or clear worms in the soil that feed on organic matter and sometimes roots.
🌿 Wet Soil Attraction – Key Clue
Population increases dramatically in overwatered or poorly draining soil.
Fungus Gnat Treatment
Attack both the adults and larvae for complete control:
- Reduce watering: Let soil dry out more between waterings to break breeding cycle
- Yellow sticky traps: Place near the plant to catch flying adults
- Sand layer: Add 1/2 inch of sand on top of soil to prevent egg laying
- Bottom watering: Water from below to keep soil surface dry
- Repotting: In severe cases, fresh soil may be necessary
Mealybugs: The White Cotton Pests
Mealybugs look like tiny cotton balls or white fuzzy spots on your fern. They’re slow-moving but persistent, feeding on plant juices and weakening your fern over time.
Mealybug Identification and Treatment
Mealybugs are relatively easy to spot and treat:
- Visual identification: White, cottony masses on fronds, stems, or soil surface
- Alcohol treatment: Dab individual bugs with rubbing alcohol on a cotton swab
- Systemic approach: Spray entire plant with diluted dish soap solution weekly
- Quarantine: Isolate affected plants to prevent spread to other houseplants
Scale Insects: The Hard-Shell Hitchhikers
Scale insects attach themselves to fern fronds and look like small brown or tan bumps. They can be mistaken for natural plant markings but will gradually weaken your fern if left untreated.
Scale Treatment Strategy
Scale requires persistence but responds well to consistent treatment:
- Manual removal: Gently scrape off individual scales with fingernail or soft brush
- Oil treatment: Apply horticultural oil or neem oil to smother remaining scales
- Follow-up treatments: Repeat every 7-10 days for 3-4 weeks to catch newly hatched crawlers
- Monitor closely: Check weekly for new infestations
Natural Treatment Methods
Most fern pest problems can be solved with gentle, natural approaches that won’t harm your plant or your home environment.
The Soap and Water Solution
A simple dish soap spray works for most soft-bodied pests:
- Mix solution: 1 teaspoon mild dish soap per quart of lukewarm water
- Test first: Spray a small area and wait 24 hours to check for damage
- Apply thoroughly: Spray all surfaces, including undersides of fronds
- Rinse after: Wash off soap residue after 2-3 hours
- Repeat weekly: Continue until pest population is eliminated
Prevention Through Plant Health
Healthy ferns are much less likely to develop serious pest problems:
- Proper watering: Avoid both overwatering and letting soil get bone dry
- Good air circulation: Use a small fan to keep air moving around plants
- Regular cleaning: Dust fronds monthly to remove pest eggs and debris
- Quarantine new plants: Keep new additions separate for 2-3 weeks
- Monitor regularly: Weekly inspections catch problems early
Pros and Cons of Treatment Approaches
Natural soap and oil treatments
Safe for indoor use, effective on most pests, and won’t harm beneficial insects.
Improving growing conditions
Addresses root causes and prevents future infestations naturally.
Early intervention
Catching pests early makes treatment faster and more successful.
Chemical insecticides indoors
Can be toxic to people and pets, and often unnecessary for small infestations.
Ignoring the problem
Small pest populations can explode quickly in ideal indoor growing conditions.
When to Take Action
Not every bug you see on your fern requires immediate intervention. Learning when to act and when to monitor helps you avoid overreacting while catching real problems early.
Act Immediately If: You see webbing, cottony masses, or clusters of insects. You notice yellowing leaves or stunted growth. Pests are spreading to other plants.
Monitor Closely If: You find just a few insects. Plant appears healthy overall. Pest activity seems contained to one area.
Regular Maintenance: Check plants weekly during routine watering. Clean fronds monthly to remove dust and eggs. Maintain proper humidity and air circulation.
Recovery After Treatment
Once you’ve eliminated the pest problem, your fern will need some time to recover and regrow any damaged foliage.
Patience with Recovery: New growth may be slow for 4-6 weeks after treatment. Avoid fertilizing stressed plants until you see healthy new growth. Continue monitoring weekly to catch any pest resurgence early.
Supporting Recovery: Maintain consistent care routines without major changes. Ensure optimal light and humidity conditions. Remove any remaining damaged fronds to redirect energy to new growth.
Frequently Asked Questions
Are the bugs on my fern dangerous to people or pets?
Most common fern pests are plant-specific and don’t bite humans or animals. However, always wash hands after handling infested plants and keep pets from eating treated foliage.
How can I prevent bringing pests home with new plants?
Always inspect new plants carefully before bringing them home, and quarantine them for 2-3 weeks in a separate area before placing with other plants.
Should I throw away a heavily infested fern?
Most pest infestations can be treated successfully. Only consider disposal if the plant is more than 70% damaged or if treatment efforts have failed repeatedly.
How long does it take to eliminate a pest problem completely?
With consistent treatment, most pest problems resolve in 3-6 weeks. The key is persistence – stopping treatment too early often leads to re-infestation.
Final Thoughts: Your Fern’s Pest Protection Plan
Dealing with fern pests might seem overwhelming at first, but remember that prevention and early detection make all the difference. Most pest problems are easily manageable when caught early and treated consistently.
The secret to successful pest control isn’t having the strongest chemicals – it’s developing good habits like regular inspection, proper plant care, and acting quickly when you spot a problem. Your fern is counting on you to be its protector against these tiny invaders.
With the knowledge you now have, you can confidently identify and treat the most common fern pests. Regular care, observation, and quick action will keep your indoor fern garden healthy and pest-free for years to come.